Roasted Ratatouille


Ratatouille is the perfect vegetable dish.
Image
A dish that forces the vegetables, and the special way they play off of each other’s flavours and textures, into the spotlight is the perfect vegetable dish; no argument to be made against it.

Get yourself to the Farmer’s Market, pick up the ingredients grown by a local farmer and marvel at this French wonder.

Image

Serves 4, very comfortably

Ratatouille

2 large tomatoes
1 bulb garlic, top sliced off so the cloves are visible
1 teaspoon olive oil
Salt, to taste

Preheat oven to 400 F (205 C). In a baking dish, place tomatoes and garlic. Drizzle with olive oil. Sprinkle with a touch of salt. Roast, uncovered for about an hour. In the meantime, if you don’t have a food processor to do all the chopping, get a head start. Once the tomatoes are soft and the garlic is golden brown and sweet, remove from the oven and let cool, until it’s comfortable enough for you to handle. Remove the garlic from the skin and set both aside. Turn the oven down to 350 F (175 C).

Image3 small green zucchini, sliced into 5 cm thick rounds, on a bias
3 small yellow zucchini, sliced into 5 cm thick rounds, on a bias
1 large eggplant, sliced into 5 cm thick rounds and then salted, on a bias
3 medium yellow onions, peeled and sliced thinly
1 large red pepper, deseeded and sliced in long strips
4 to 6 cherry tomatoes, halved (optional)
Large handful of fresh basil and fresh thyme,
1 tablespoon dried oregano, rubbed in your hand
Salt and freshly cracked black pepper, to taste
2 to 3 tablespoons olive oil

It’s important you salt the eggplant individually because it (in my experience) guarantees the correct melt-in-your-mouth texture.

Grease a large round baking dish with olive oil. Place your roasted tomatoes and garlic in it. Using a potato masher, mash the garlic into the tomatoes. You don’t want a sauce, but you do want the garlic and the tomatoes to be well mixed and to cover the bottom of the baking dish fairly evenly. Season with a touch of salt and pepper, a drizzle more of olive oil and a couple pinches of the herbs. Reserve a half cup or so, to pour on top of the sliced vegetables.

Image
Layer the slices of vegetables in concentric circles on top of the tomato sauce. Drizzle with olive oil, season with salt and pepper and herbs. Place the reserved half cup of tomatoes and garlic in the middle. I lay a large handful fresh thyme across the top (because it’s wonderful and my one of my favourites).  Arrange halved cherry tomatoes around the sides of the dish, if using. Cover and cook for 45 minutes. Cook an additional 15 to 20 uncovered.

I served mine with an herbed polenta and it was heaven. You do whatever you need to to achieve yours.

Looking on the brightest of the bright sides, it has to be said that the clean up of gluten free flours is significantly easier than that of their wheaty counterparts. This is a most excellent development.

This short and bright blog post has been made from my hometown of Winnipeg. Expect something longer and more exciting in the next few days!

Wedding Menu

Having spent countless hours pouring over pictures of bright and colourful foods, my wedding’s officiant (oh, and bestie) made a significant amount of progress on the weddings menu yesterday. After a little sleep, I’ve hammered out the final product.

We’re having the wedding in a public park, with just over 30 guests. It’s relatively casual event, with a picnic motif. My dress is a mint green and the wedding party (Maid of Honour and Best Man) will be wearing bow ties. For the only part that really gets me excited – THE FOOD – I want to set up a salad and sandwich bar for our guests to assemble their own food, so bright colours and contrasting flavours and textures are really important. The plan is to have two long plastic containers filled with ice and the components of each bar sitting in their own containers on top of that ice.

Prepared Salads
coleslaw with creamy cilantro dressing
quinoa salad with edamame
roasted new potato salad with fresh sage, rosemary and roasted garlic
For Sandwiches
brown bread, white bread, pita bread
marinated mushrooms, falafel patties and marinated tofu
roasted fennel, sweet potato, eggplant, onion, zucchini
salad ingredients
For Salad
assorted baby lettuces, spinach
cherry heirloom tomatoes, carrots, cucumber, bell pepper, red onion, celery, green beans, daikon, shredded beets, feta (maybe if it’s not awful but I can’t trust the reviews on the Happy Herbivore’s site because people always kiss her ass)
pickles, olives, capers, raisins, dried cranberries, sunflower seeds, pumpkin seeds, hot peppers, pickled turnips
fresh flat leaf parsley, basil, dill, cilantro, mint, chives
Spreads and Dressings
beet tahini, spicy lemon aioli and tahini peanut sauce
oil olive, lemon and herb vinaigrette, roasted red pepper balsamic vinaigrette and poppy seed dressing
Misc
roasted corn on the cob half plain, half in a cilantro lime chili butter
thai salad rolls with mango, smoked tofu and basil
Drinks
rosemary lemonade, strawberry basil iced tea, iced mochas, water
Desserts
wedding cupcakes – green tea with raspberry buttercream
butter tart squares (Hello! We’re Canadian!)

Refried Bean Pupusas with Curtido

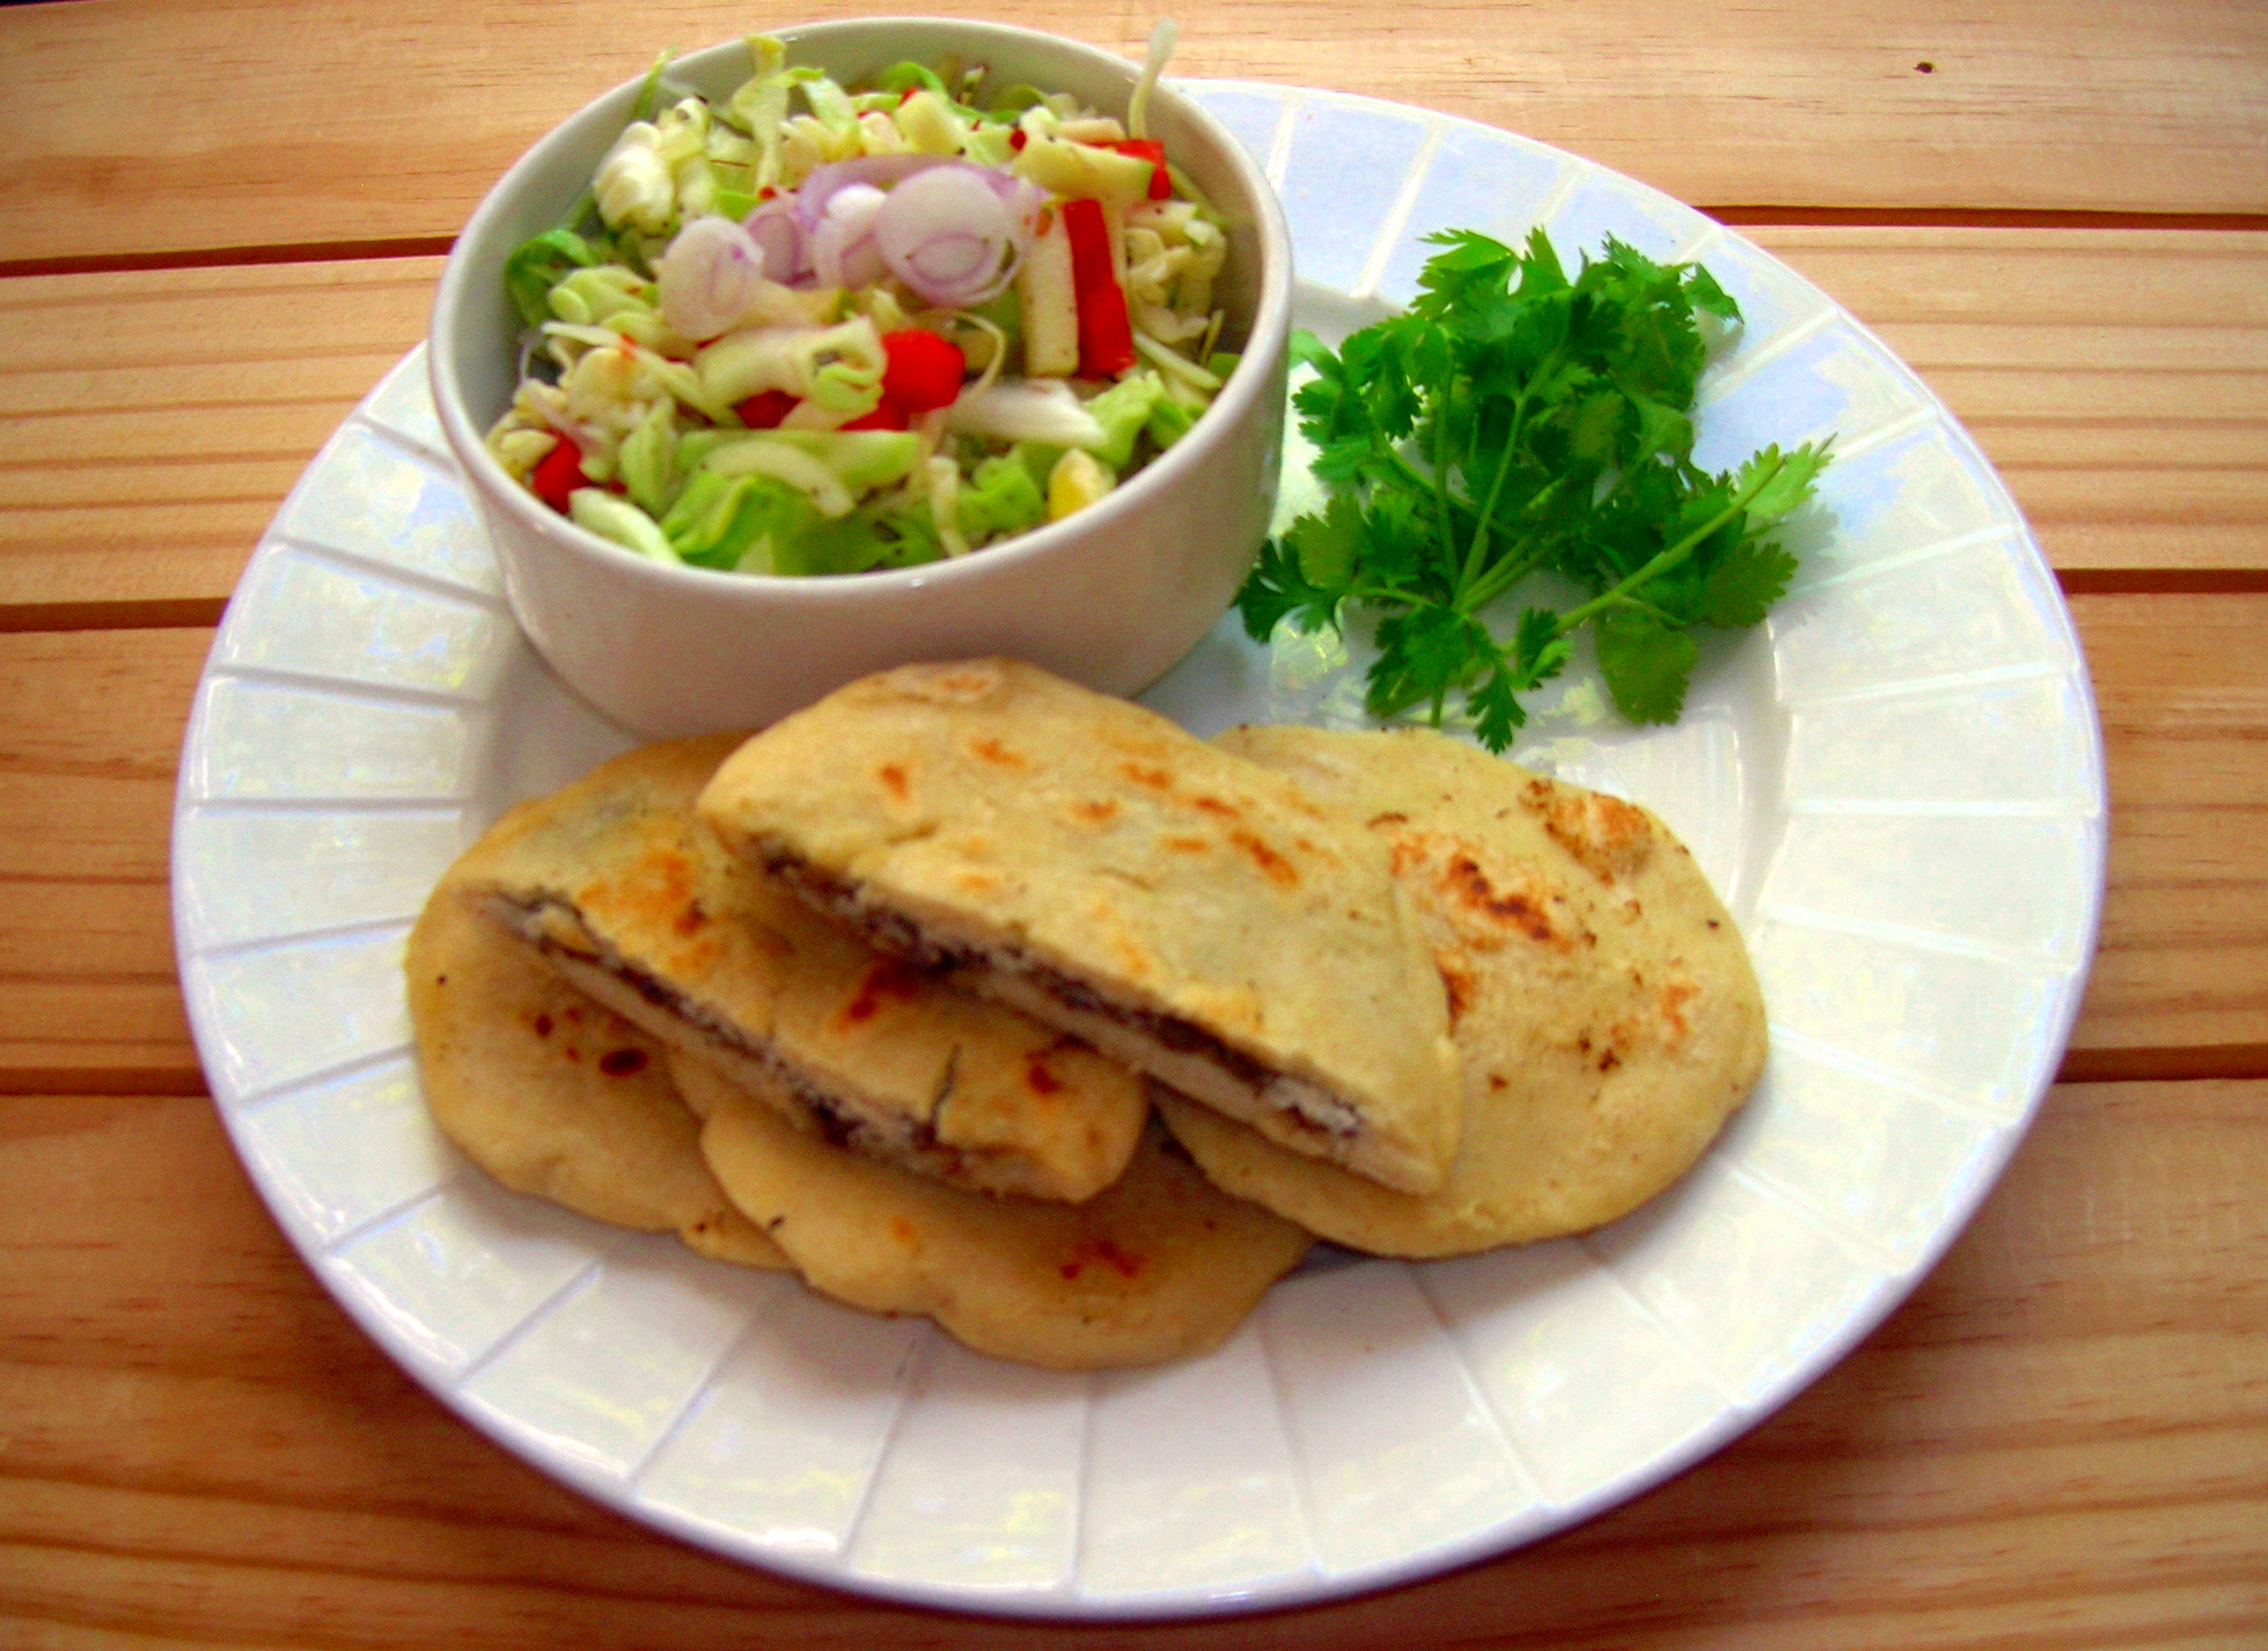
Growing up in Winnipeg, I always managed to have an in with a Salvadorean family, so although it may seem a little strange that this Canadian ginger’s favourite childhood dish would have been pupusas, there you have it. For those not in the know, pupusas are a corn tortilla that have a super tasty bean (or cheese or pork) filling and are topped with a spicy cabbage salad. I think I may have tried once or twice as a child to assemble these, but simply lacked the dexterity to work with the relatively delicate nature of masa harina. Going gluten free provided me with the perfect opportunity to try again! I served these to company for dinner and the leftovers a day later as part of a large brunch. Big hit!

pupusas

I’m only providing the bean recipe, but daiya mozzarella would be a wonderful filling on its own and combined with the beans. No beans for my fiance because he is allergic them, with soy appearing to be the only exception. Traditionally the curtido has onion, cabbage and carrot, but (again) my fiance is allergic to raw carrot, so I subbed red pepper, for sweet and apple, for crunch. These are such a fun thing to eat and it only takes a little practice to get used to working with the dough, so you should definitely try them. Or, go out and find a pupusaria.

Makes 16 pupusas, with leftover refried beans

Curtido

Half a head of cabbage, shredded
Half a red pepper, deseeded and cut into matchsticks
Half a firm apple (I used Granny Smith), cored and cut into matchsticks
1 small onion, sliced thinly
1 teaspoon dried oregano
1/2 teaspoon red pepper flakes
3/4 teaspoon salt
1/2 teaspoon sugar
3/4 cup white vinegar
1/4 cup water

curtido

Combine all ingredients in a large bowl and stir until well mixed. Cover and refrigerate for at least 3 hours, but longer is better! You can stir the mixture around to make sure it’s pickling evenly, but if you’re letting it sit overnight, that won’t be necessary.

Refried Pinto Beans

1 medium yellow onion, diced
4 cloves garlic, minced
2 tablespoons olive oil (or whatever you have on hand)
2 cups cooked pinto beans
3/4 cup green salsa (any flavourful and non-chunky salsa would do the trick)
1/2 cup vegetable broth
1 teaspoon cumin seeds, crushed in your hand
1/2 teaspoon cinnamon
Pinch of nutmeg
Pinch of smoked paprika
Salt, to taste.

In a large (and scratch-proof) skillet, heat the oil over medium heat and add the onions and garlic. Saute for several minutes until the onions are translucent. Add in the beans and salsa and stir to combine. Now it’s time to start mashing the beans, which I always do with a fork. Add the broth in, a little at a time, mashing between additions. Once the beans are fully mashed, lower the heat, add the seasoning and let cook until the desired consistency is reached. The beans are going the thicken up a bit as they cool, so keep that in mind. Once cooked, set aside and let cool until you can handle them by hand. My fingers are mighty tough because of all the cooking I do, so just do what you need to to be comfortable.

pupusa ingredients

Pupusa Assembly

4 cups masa harina
2 2/3 cups warm water
pinch of salt
Oil, for the griddle and your hands

Combine all ingrdients in a large bowl and mix with your hands. It’s going to seem, at first, like you’ve got too much water going on, but it firms up quickly as the corn absorbs the water. You may need to add a little more masa harina or water, but I’d rather you let it sit for 10 minutes covered on the counter and then decide if it needs more. You’re going to be working quite a bit with the dough, so you need it not to crack when shaping it.

Divide dough into 16 balls. Preheat a lightly greased griddle to a medium high temperature. Cover hands in oil and mold one of the balls into a cup-like shape. If the dough is cracking, you need more water, so wet hands and reshape the ball with the extra moisture. If you’ve never worked with corn tortillas before, you’ll need a little practice. Once you’ve formed the cup, add a tablespoon of refried beans and seal the ball back up. Now, you’ve got to flatten the ball, with greased hands, into the familiar tortilla shape. Cook on the heated griddle, a couple of minutes a side. Repeat until all pupusas are stuffed and ready to eat. You can keep the already cooked ones covered, in a low oven, to keep them warm.

Top with curtido and eat.

Puffed Rice Square with Salted Caramel

When I was faced with the task of coming up with my first dessert after cutting out the gluten, I figured I would start from the bottom and begin re-working classic (and easy!!) desserts from my childhood. So, here we have it! The Canadian (??) puffed wheat square – reworked and taken the next level with salted caramel. I’ve made real caramel before; I’ve made cheat caramel before, also made dulce de la leche, coconut milk dulce de la leche – this is the easiest of them all.

Image

Salted Caramel Topping

1/8 cup Earth Balance (or other vegan margarine)
1/4 brown sugar
1 tablespoon light corn syrup
1/8 teaspoon sea salt
1/4 teaspoon real vanilla extract
Tiniest pinch of baking soda

In a thick bottomed saucepan, melt margarine over medium heat. Add sugar, corn syrup and salt and let it come to a boil while stirring constantly. Once boiling, stop stirring and let it boil for two minutes. Take off the heat and add the vanilla and baking soda and whisk together.

Puffed Rice Square

Makes one 9 x 13 baking dish

6 cups puffed rice cereal
1/3 cup Earth Balance (or other vegan margarine), plus extra for greasing pan
1/2 cup brown sugar
1/3 light corn syrup
3 tablespoons cocoa powder

Grease a 9 x 13 baking dish. Melt butter, sugar, corn syrup and cocoa powder in a medium sized sauce pan over medium heat and bring to a boil, stirring often. Once the mixture is boiling, reduce the heat to low and let it simmer for about 2 minutes. Measure your cereal into a large bowl and pour the sugar mixture over it. Combine, until evenly coated, with a greased spatula. Press the sticky cereal into the prepared baking dish. Drizzle with desired amount of caramel, sea salt (if desired) and put in the fridge to set until completely cool, usually a couple of hours.

Reluctant

All my adult life I’ve battled chronic stomach pain, headaches, lethargy (there hasn’t been a day since I was 16 when I wasn’t exhausted and my PTSD/imsomnia didn’t kick in until I was 21 so…) and the general hum of something not being quite right but not wrong enough for a doctor to do anything about it. Things improved by leaps and bounds when I went vegan, but the hum kept on going.

A few weeks ago, I had a really terrible reaction to seitan (which is basically entirely gluten). I could hardly move for several days. I consider myself reasonable and have zero interest in fad diets or health crazes. Veganism is and will always be about limiting harm where I can. The problem is, this particular reaction could not be ignored. I planned a 3 week elimination diet, complete with a terrible attitude about the whole thing because I DON’T WANT TO BE ONE OF THOSE PEOPLE.

The elimination diet didn’t last as long as I’d planned because holy moly this is a hard adjustment, but since reintroducing gluten back into my diet I’ve been reallllllllllly bloody sick, so here we are. Doctors give me major anxiety and have never helped me with anything at all in the past. I’ll eventually pursue an official diagnosis, of course but I can’t ignore what’s happened the past few weeks because I don’t want to feel horrible all the time just to avoid being ‘one of them’. I’m aware that most people only feel better when they eliminate gluten because they have to make a shift towards whole foods, but that has never, ever been an issue for me. Produce is my life.

It’s entirely more stressful because my fiance has a myriad of allergies that we’re still figuring out. I’ll definitely whine about some of this stuff in the future, but right now I’m trying to have a positive attitude.

I’m a major foodie and cooking is my true love and authentic talent, so I’m determined to become the best of all the gluten free kingdom but please be kind to me and understand this is the last thing I ever wanted and I’m doing this to finally shake the malaise that has been with me for the past 13 years. I’ve overhauled every. single. aspect of my life in the past year and half (some intentional; some thrust upon me with no consent; perhaps more on that later) and it’s lead me to a really great place, so let’s add this to the column of things to be excited about!!

The goal here is to blog my adventures in my gluten free and vegan life with a hearty mix of recipes, product reviews and for the all important seasoning: personal posts. There will be no sugar free or oil free posts because there is an absolute overabundance of those that already exist and the transition to a gluten free life is already stressful enough thankyouverymuch.